Prototype #2
Here's some images of my second cable and connector prototype.
(click on the image for a larger version)
IDE Cable Prototype #2:


This being my second prototype cable, I'm a bit happier with the result. The nice thing is that this is actually a WORKING sample! I ordered a CoolMaster rounded cable and proceeded to remove all the wire jacketing. This saved me the hassle of fabricating my own wiring (and aren't that expensive anyways). I've used microphone cable for power since there are two wires and a shield which allows for the needed copper paths that are found in a molex PC power connector. I simply split the shield into two wires as they terminated. The setup works just fine and has undergone extensive testing to ensure there is no electrical noise problems.
As you can see, this cable assembly is designed to connect into the existing power supply at the base (motherboard connection) and feed the drives from there. Although this is an improvement over the current system, my ultimate plan is to customize the entire power supply system to integrate the IDE cables. This way there is an extreemly clean internal wiring scheme (as some of my conceptual drawings show here).
I will be posting some tutorials about how I fabricate these connectors in the next few days...


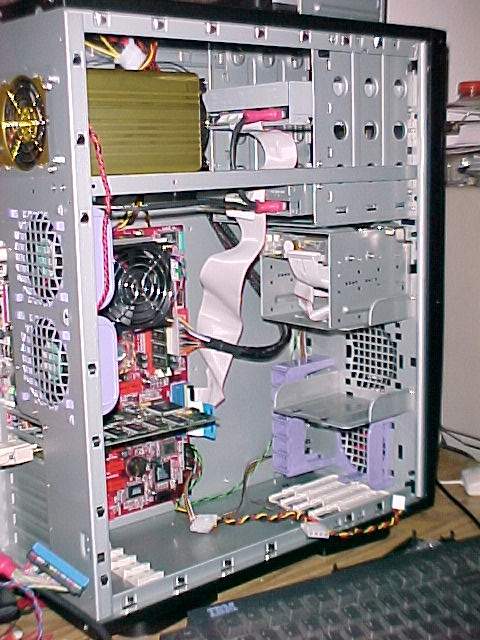
Here you can see the test rig (my old Abit KT-7A with a recently resurrected BIOS chip) where I did most of the verification that this cable is a working sample. I've managed to watch DVD's, burn CD's, and use HDD's off of this cable with not one problem.


This sequence of shots shows the different phases of wiring cleanup.
First: stock wiring
Second: twisted power cables
Third: heat shrink applied (I'll have a tutorial on this soon)
Fourth: my special rounded cable with integrated power
As you can see, the direction of the cable breakout from the connector is pretty critical to clean routing. In the case above, the direction the cable breaks out from the motherboard is down (not too good when you're running UP the inside of the case). I had better luck with the Abit motherboard (shown above) as the mounting of the IDE cables was in the opposite direction.

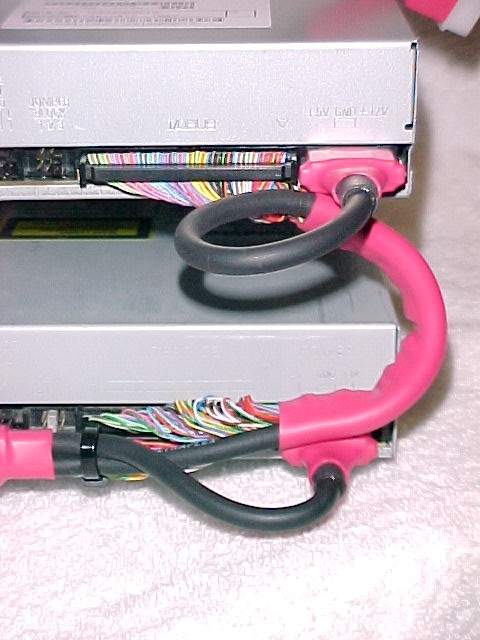
A closeup of the assembly mounted in another test rig. I'm still not that happy with the look just yet. I'm pretty sure I can clean up the shape of the wiring shown under the red heat shring looking "lumpy". I also would route the first power cable connector out of the bottom of the cable and not the top (as shown). I may use a thinner power cable in the near future if I can find any around town here. I'm happy with the cable I have but the insulation is rather unnecessarily thick for this application. We'll see...
(click on the image for a larger version)
IDE Cable Prototype #2:

This being my second prototype cable, I'm a bit happier with the result. The nice thing is that this is actually a WORKING sample! I ordered a CoolMaster rounded cable and proceeded to remove all the wire jacketing. This saved me the hassle of fabricating my own wiring (and aren't that expensive anyways). I've used microphone cable for power since there are two wires and a shield which allows for the needed copper paths that are found in a molex PC power connector. I simply split the shield into two wires as they terminated. The setup works just fine and has undergone extensive testing to ensure there is no electrical noise problems.
As you can see, this cable assembly is designed to connect into the existing power supply at the base (motherboard connection) and feed the drives from there. Although this is an improvement over the current system, my ultimate plan is to customize the entire power supply system to integrate the IDE cables. This way there is an extreemly clean internal wiring scheme (as some of my conceptual drawings show here).
I will be posting some tutorials about how I fabricate these connectors in the next few days...


Here you can see the test rig (my old Abit KT-7A with a recently resurrected BIOS chip) where I did most of the verification that this cable is a working sample. I've managed to watch DVD's, burn CD's, and use HDD's off of this cable with not one problem.


This sequence of shots shows the different phases of wiring cleanup.
First: stock wiring
Second: twisted power cables
Third: heat shrink applied (I'll have a tutorial on this soon)
Fourth: my special rounded cable with integrated power
As you can see, the direction of the cable breakout from the connector is pretty critical to clean routing. In the case above, the direction the cable breaks out from the motherboard is down (not too good when you're running UP the inside of the case). I had better luck with the Abit motherboard (shown above) as the mounting of the IDE cables was in the opposite direction.

A closeup of the assembly mounted in another test rig. I'm still not that happy with the look just yet. I'm pretty sure I can clean up the shape of the wiring shown under the red heat shring looking "lumpy". I also would route the first power cable connector out of the bottom of the cable and not the top (as shown). I may use a thinner power cable in the near future if I can find any around town here. I'm happy with the cable I have but the insulation is rather unnecessarily thick for this application. We'll see...